Keywords:

Introduction
Database auditing is a critical practice for ensuring data integrity, compliance, and security which refers monitoring and logging of persistent entity-related events, or just entity versioning. By using the above mentioned feature Object-Relational Mapping (ORM) frameworks, you can implement robust auditing systems to track and log entity-related events such as insert, update, and delete operations. This guide will demonstrate you how to integrate database auditing into your Spring Boot application using Spring JPA Auditing and Hibernate Envers.
Why Database Auditing Matters?
Database auditing provides:
- Compliance Assurance: Meets regulatory requirements like GDPR, HIPAA, and PCI-DSS.
- Data Integrity: It tracks changes to critical data in real-time.
- Enhanced Security: It detects the unauthorized modifications.
- Historical Analysis: It enables version control and rollback capabilities.
Getting Started
For implementing this auditing mechanism, we need to configure an EntityManagerFactory and customising Hibernate properties to manage entity versioning and audit trails effectively.
Here, we are going to use the features of Spring JPA and Hibernate to implement a robust auditing mechanism. Here, our core idea is to set up a JPA EntityManagerFactory, which handles all low-level tasks related to database auditing seamlessly.
Step 1: Configure the EntityManagerFactory
So as per the first step, let's get started by creating our database configuration class named EntityManagerDatasourceConfig.java. Then let's annotate it with the @Configuration annotation to make sure that this class provides Spring-managed beans and configuration.
- As per the 2nd step, let's use the
@EnableJpaRepositoriesannotation at the class level to specify the base packages containing the JPA repository interfaces. This annotation mainly instructs Spring to scan and manage the repositories under the specified package. Then let's define a new Bean for EntityManagerFactoryBean. For that, let's define a method annotated with
@Bean(name = "entityManagerFactory")inside our Configuration Class. This method will return aLocalContainerEntityManagerFactoryBeaninstance, which is responsible for creating theEntityManagerFactory.Configure the LocalContainerEntityManagerFactoryBeanPersistence Provider: Set the persistence provider to Hibernate by calling the setPersistenceProvider() method and passing an instance of HibernatePersistenceProvider.
Entity Package Scanning: Define the package containing JPA entity classes using the setPackagesToScan() method. This allows the factory to locate and manage the entity classes.
Data Source: Inject the javax.sql.DataSource instance into the factory using the setDataSource() method. Ensure the DataSource bean is autowired in the configuration class.
Define JPA Properties
Create a
Propertiesobject to hold additional JPA configurations. Configure the properties to meet specific requirements:
Audit Table Suffix: Use theorg.hibernate.envers.audit_table_suffixproperty to set a custom suffix for audit tables (e.g.,_hst).
Auto Schema Update: Optionally, enablehibernate.hbm2ddl.autowith the valueupdatefor development environments. This updates the table structure automatically when changes are made to the entity classes. Avoid using this in production environments.
Assign the configuredPropertiesobject to the factory using thesetJpaProperties()method.Finalize the Configuration
Invoke the
afterPropertiesSet()method on theLocalContainerEntityManagerFactoryBeanto initialize the factory.Return the
EntityManagerFactoryThe method should return the
EntityManagerFactoryinstance created by theLocalContainerEntityManagerFactoryBean.
Key Configurations:
- Audit Table Suffix: The
org.hibernate.envers.audit_table_suffixproperty changes the audit table suffix to_hst. - Auto-Update Mode:
hibernate.hbm2ddl.autoensures table structures are updated during development. Avoid using it in production. - DataSource: Injects the
DataSourcebean for database connectivity.
With the above-mentioned changes, the
EntityManagerFactory configuration is complete. However, these modifications alone are not sufficient for enabling auditing. To implement auditing, each entity that requires auditing must be annotated with @Audited (which comes from org.hibernate.envers.Audited), as demonstrated in the following code snippet.Step 2: Add the @Audited Annotation
Enable auditing by annotating entities with @Audited. Example:
import java.io.Serializable;
import java.sql.Timestamp;

import javax.persistence.*;
import org.hibernate.envers.Audited;

import lombok.Getter;
import lombok.Setter;


@Audited
@Getter
@Setter
@Entity
@Table(name = "notification")
public class Notification implements Serializable {

   private static final long serialVersionUID = 1L;

   @Id
   @GeneratedValue(strategy = GenerationType.IDENTITY)
   @Column(name = "notification_id")
   private Long id;

   @Column(name = "user_id")
   private Long userId;

   @Column(name = "firebase_client_token")
   private String token;

   @Enumerated(EnumType.STRING)
   @Column(name = "platform")
   private DevicePlatform platform;

   @Enumerated(EnumType.STRING)
   @Column(name = "status")
   private ActiveStatus activeStatus;

   @Column(name = "last_updated_date_time")
   private Timestamp lastUpdatedDateTime;

   @Column(name = "last_updated_user")
   private String lastUpdatedUser;
}
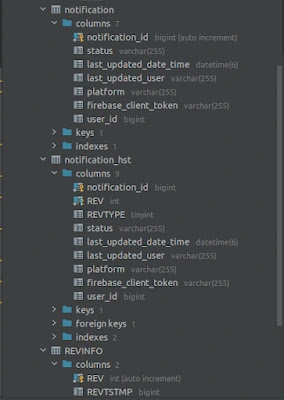
Step 3: Verify Audit Table Generation
Upon starting your application, Hibernate Envers creates audit tables with the suffix _hst. For example, the entity table notification will have an audit table named notification_hst.
Step 4: Tracking Changes
Audit tables capture entity state changes:
- Insert: Logs the initial state.
- Update: Records old and new values.
- Delete: Logs the state before deletion.
Advanced Configurations
Custom Naming Conventions: Adjust audit table prefixes or suffixes.
Entity Listeners: Implement custom entity listeners for granular control.
Query APIs: Use Hibernate Envers APIs to retrieve historical data for analysis.
Benefits of ORM-Based Database Auditing
- Seamless Integration: Combines Spring Boot, JPA, and Hibernate for a cohesive solution.
- Comprehensive Logging: Tracks every database operation efficiently.
- Regulatory Compliance: Supports industry standards for data auditing.
- Scalability: Handles large-scale applications effortlessly.
Keywords:


0 Comments